
Craft Your Own Gourmet Hot Chocolate on a Stick: A Delightful DIY Experience
There’s something inherently magical about a steaming mug of hot chocolate on a chilly day. The rich aroma, the creamy texture, and the warmth it brings are pure comfort. However, the joy can quickly turn to disappointment when faced with the exorbitant prices of gourmet hot chocolate sticks in specialty stores. I recently stumbled upon these adorable treats for a staggering $6 each at a popular store – a price that just didn’t sit right. Why pay so much when you can create a superior, more personalized version right in your own kitchen?
That realization sparked a mission: to master the art of making homemade hot chocolate on a stick. Not only is it an incredibly satisfying way to indulge my love for all things chocolate, but it also provides the perfect excuse to craft thoughtful, delicious gifts for friends, family, and colleagues during the holiday season or any special occasion. Forget the high prices; embrace the warmth and generosity of homemade goodness!
Why Homemade Hot Chocolate Sticks Are a Game-Changer
Making your own hot chocolate on a stick offers numerous advantages beyond just saving money. It’s an experience that tantalizes your taste buds, allows for creative expression, and offers a personal touch that store-bought items simply can’t replicate. Here’s why you should embark on this delightful DIY journey:
- Cost-Effectiveness: As mentioned, commercial hot chocolate sticks can be surprisingly expensive. By making them at home, you can produce a large batch for a fraction of the cost, making them an ideal choice for party favors or multiple gifts.
- Unleash Your Creativity: From choosing your favorite type of chocolate (dark, milk, white, or a blend) to incorporating unique flavorings and toppings, the customization options are endless. Add a pinch of sea salt, a hint of peppermint, or a dash of chili powder for an adventurous twist.
- Superior Quality & Freshness: You control every ingredient that goes into your hot chocolate sticks. Opt for high-quality chocolate, fresh cream, and natural flavorings, ensuring a rich, authentic taste that’s far superior to many mass-produced versions.
- The Perfect Edible Gift: Thoughtful, handcrafted gifts always leave a lasting impression. Neatly packaged hot chocolate sticks, perhaps paired with some homemade marshmallows or a festive mug, make for a charming and much-appreciated present for any occasion.
- A Fun Family Activity: Involving kids (under supervision) in the process can be a wonderful way to spend time together, teaching them basic cooking skills and fostering creativity.
The Simple Magic Behind the Treat
The concept of hot chocolate on a stick is deceptively simple yet brilliantly effective. It’s essentially a block of solid, concentrated chocolate mix, often adorned with a marshmallow, affixed to a wooden stick. When submerged in hot milk and stirred, the chocolate slowly melts, transforming into a luxurious, warm beverage. The key lies in creating a solid chocolate base that’s rich enough to dissolve into a flavorful drink without being overly sweet or bland.
Gathering Your Essential Ingredients
This recipe, adapted from a reliable source like King Arthur’s website, proves just how effortless it is to achieve gourmet results at home. With a few staple ingredients, you’ll be well on your way to crafting these delightful treats. Quality ingredients truly make a difference here, so choose the best you can find.
- Sweetened Condensed Milk: This is the secret to the sticks’ rich, fudgy texture and inherent sweetness. It ensures a smooth melt and a delightful creaminess in your final drink.
- Heavy Cream: Adding heavy cream further enhances the luxurious mouthfeel of the chocolate base, making it incredibly decadent.
- Chocolate Chips (or Chopped Chocolate): The star of the show! You’ll need a generous amount. Feel free to experiment with different types—semi-sweet for a classic flavor, milk chocolate for extra sweetness, or dark chocolate for a more intense cocoa experience. Ensure your chocolate is of good quality; it truly makes a difference in the final taste.
- Unsweetened Baking Chocolate: A crucial ingredient to balance the sweetness from the condensed milk and deepen the overall chocolate flavor, giving it a more sophisticated profile.
- Wooden Sticks: These are essential for the “on a stick” experience! Lollipop sticks, craft sticks, or even small sturdy skewers work perfectly.
- Marshmallows: An optional but highly recommended addition. Homemade marshmallows (like these Homemade Peppermint Marshmallows) elevate the experience, adding a soft, fluffy counterpoint to the rich chocolate. Store-bought marshmallows are also perfectly fine.
Step-by-Step Guide to Crafting Perfection
Creating these hot chocolate sticks is a straightforward process, but it requires a bit of patience, especially for the chilling phase. Plan to make them in the evening so they can firm up overnight.
Preparation is Key
Start by lining an 8×8 inch pan with parchment paper, leaving an overhang on the sides. This simple step is crucial for easy removal of the set chocolate later, preventing it from sticking to the pan and ensuring clean cuts. Having your ingredients measured out and your tools ready will make the process flow smoothly.
Creating the Velvety Chocolate Base
In a medium saucepan, combine the heavy cream and sweetened condensed milk. Heat this mixture over a low flame, stirring gently until the milk just begins to steam. The goal is to warm it thoroughly without bringing it to a boil. Once steaming, remove the pan from the heat and add all of your chocolate chips and unsweetened baking chocolate. Resist the urge to stir! Let the chocolate sit undisturbed in the warm liquid for about 10 minutes. This allows the residual heat to gently melt the chocolate, ensuring a smooth and lump-free mixture.
After the resting period, return the saucepan to low heat. Begin whisking the mixture carefully and continuously. You’ll notice the chocolate transforming into a glossy, homogenous, and beautifully rich ganache-like consistency. Continue whisking until all the chocolate is fully melted and seamlessly combined with the cream and condensed milk. This stage is vital for a smooth-melting hot chocolate stick.
The Overnight Chill: Patience is a Virtue
Once your chocolate mixture is perfectly smooth, pour it into the prepared pan. Gently tap the pan a few times on your counter to help level the mixture and release any trapped air bubbles. Now comes the most important waiting period: allow the chocolate to sit and firm up overnight, or for a minimum of 8 hours. Covering the pan with a paper towel or plastic wrap can prevent dust or other particles from settling on your chocolate as it cools. This extended chilling time is crucial for achieving the firm texture needed for cutting and assembling your sticks.
Precision Cutting for Beautiful Sticks
The next morning, or after the chocolate has fully set, carefully lift the entire slab out of the pan using the parchment paper overhangs. Place it onto a clean cutting surface. To achieve neat, even squares, a trick of the trade involves using a hot knife. Keep a large, sharp knife handy next to a sink with hot running water. After every few cuts, hold your knife under the hot water for a moment, then quickly dry it thoroughly before making the next set of cuts. This technique warms the blade, allowing it to glide through the firm chocolate cleanly, resulting in smooth, precise edges. Aim for approximately 1-inch squares, doing your best to keep them uniform in size for consistent melting and presentation.
Assembling Your Hot Chocolate Sticks
Before adding the sticks, you have an optional step: rolling the chocolate squares in a dusting of cocoa powder, much like a truffle. This adds a beautiful matte finish and a slight bitterness that complements the sweetness. For assembly, simply take a wooden stick and carefully skewer one marshmallow (if using), followed by one chocolate square. That’s it! The marshmallow helps secure the chocolate and acts as a delicious topping when the drink is ready.
Gifting and Serving: Spreading Warmth and Joy
Presentation Perfect for Gifting
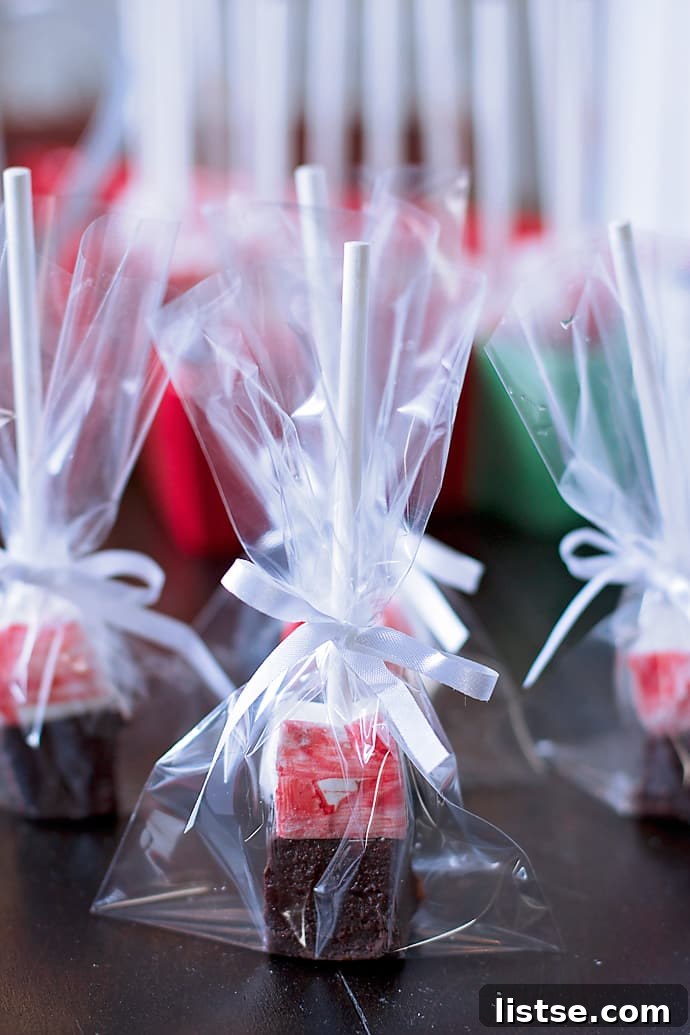
These homemade hot chocolate sticks are truly a gift from the heart. For those destined to be presents, wrap each stick individually in cellophane bags, tying them off with a pretty ribbon. You can add a small tag with instructions for use and perhaps a personal message. They make delightful additions to holiday gift baskets, thoughtful hostess gifts, or charming stocking stuffers. Imagine the delight on someone’s face receiving such a unique and delicious handcrafted treat!
Serving Up Warmth at Gatherings
When entertaining, arrange the hot chocolate sticks artfully on a serving tray, perhaps alongside a kettle of steaming hot milk and a bowl of extra marshmallows or other toppings like whipped cream, sprinkles, or crushed candy canes. This creates an inviting hot chocolate bar experience that guests will love. It’s an interactive and comforting way to serve a classic beverage, allowing everyone to customize their drink.
Creative Variations to Explore
Don’t stop at the basic recipe! Here are some ideas to elevate your hot chocolate sticks:
- Mint Chocolate: Add a few drops of peppermint extract to the melted chocolate mixture.
- Spicy Chili Chocolate: A pinch of cayenne pepper or chili powder can add a warm, intriguing kick.
- Orange Infusion: Incorporate orange zest into the hot chocolate base for a bright, citrusy note.
- Cinnamon & Spice: A dash of cinnamon, nutmeg, or even a tiny amount of cardamom can transform the flavor profile.
- Coffee Lover’s Dream: Mix in a teaspoon of instant espresso powder to enhance the chocolate’s depth.
- White Chocolate Delight: Use white chocolate chips for a lighter, sweeter alternative.
- Adult Indulgence: Add a splash of a liqueur like Kahlúa, Baileys, or Grand Marnier to the hot milk before stirring in the chocolate stick for a grown-up treat.
Enjoying Your Creation
To enjoy, simply place one hot chocolate and marshmallow stick into your favorite mug. Pour steaming hot milk (dairy or non-dairy works beautifully) over the top. It will take a couple of minutes for the solid chocolate to fully melt, so stir it gently but consistently to ensure everything dissolves evenly and doesn’t stick to the bottom of the mug. Once melted, you’ll have a wonderfully rich, creamy, and decadent cup of hot chocolate, perfectly sweetened and deeply satisfying. Add more marshmallows if you like, or a dollop of whipped cream!
Tips for the Best Hot Chocolate on a Stick
- Storage: Store your finished hot chocolate sticks in an airtight container at room temperature for up to two weeks, or in the refrigerator for longer freshness.
- Chocolate Quality: The better the chocolate you use, the better your hot chocolate will taste. Invest in good quality chocolate chips or baking bars.
- Melting Milk: Ensure your milk is truly hot, but not boiling rapidly, for optimal melting.
- Don’t Rush the Chill: The overnight chilling is non-negotiable for perfectly firm, easy-to-handle squares.
- Serving Size: These squares are quite rich, so one stick per mug is usually plenty.
I must confess, I’ve lost count of how many batches of these hot chocolate sticks I’ve made since perfecting the recipe. Let’s just say it’s been more than a few, and each one has brought immense joy and delicious warmth. This recipe is a testament to the fact that the best things often come from your own kitchen, crafted with care and a touch of creativity. So go ahead, give this recipe a try and create your own gourmet hot chocolate experience!
Hot Chocolate on a Stick Recipe
Prep Time: 20 mins
Cook Time: 8 hrs
Total Time: 8 hrs 20 mins
Ingredients
- 14 oz can of sweetened condensed milk
- ½ cup of heavy cream
- 3 cups of chocolate chips (semi-sweet or your preferred type)
- ¾ cup unsweetened baking chocolate, chopped
- Wooden sticks (lollipop sticks, craft sticks)
- Marshmallows (homemade or store-bought, see Homemade Peppermint Marshmallows for recipe link)
Instructions
- Line an 8″ x 8″ pan with parchment paper, allowing some overhang for easy removal.
- Combine the heavy cream and sweetened condensed milk in a medium saucepan. Heat over low heat, stirring occasionally, until the mixture begins to steam gently. Do not bring to a boil.
- Remove the saucepan from the heat. Add all of the chocolate chips and chopped unsweetened baking chocolate. Let the mixture sit undisturbed for 10 minutes to allow the chocolate to melt.
- Return the pan to low heat. Whisk the mixture continuously until the chocolate is fully melted and smoothly incorporated with the cream and condensed milk, forming a glossy ganache.
- Pour the chocolate mixture into the prepared pan. Gently tap the pan on the counter a few times to level the surface and release any air bubbles.
- Set the pan aside and let the chocolate cool and firm up overnight, or for at least 8 hours. You may cover it loosely with a paper towel or plastic wrap.
- Once the chocolate is firm, use the parchment paper overhangs to lift the chocolate slab out of the pan and place it on a clean cutting surface.
- To cut, heat a large, sharp knife under hot running water, then quickly dry it. Cut the chocolate into approximately 1-inch squares. Reheat and dry the knife every few cuts for clean edges.
- Optional: For an extra touch, roll each chocolate square in cocoa powder for a truffle-like finish.
- To assemble your Hot Chocolate on a Stick, carefully skewer one marshmallow (if using) onto a wooden stick, followed by one chocolate square.
- When ready to enjoy, place one stick in a mug and pour steaming hot milk over it. Stir gently for a couple of minutes until the chocolate fully melts and mixes into the milk.
- ENJOY your rich, homemade hot chocolate!