
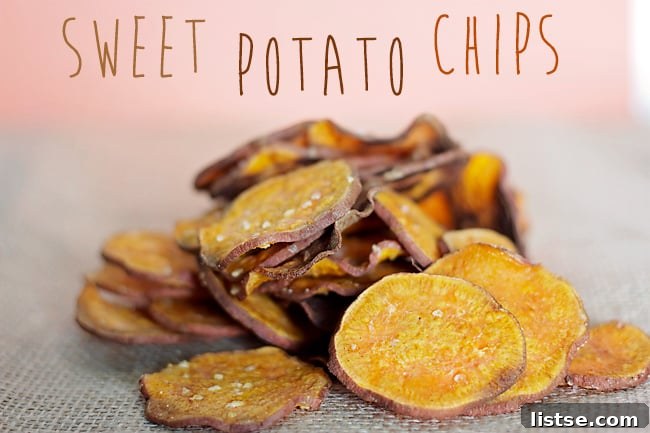
Homemade Crispy Sweet Potato Chips: Your Ultimate Healthy Snack!
Life has a funny way of taking over, doesn’t it? Whether you’re navigating demanding academic pursuits, balancing a busy work schedule, or simply embracing the beautiful chaos of everyday life, finding moments of calm and comfort is essential. For me, during a particularly intense period of studying for a comprehensive exam that would determine my graduation, my free time was almost entirely consumed by textbooks and notes. In these high-pressure moments, a reliable and satisfying snack becomes more than just sustenance; it becomes a small reward, a comforting companion through the grind. And let’s be honest, sometimes a little indulgence is exactly what’s needed to make those tough study sessions feel a little less daunting.
While I always aim to kick things off with healthier options like fresh fruit and crunchy vegetables, there’s a limit to how many handfuls of almonds (even the delicious cocoa-covered ones!) one can consume before the desire for something different, something with a bit more crunch and flavor, becomes undeniable. It’s during these times that a trip to the store for less-than-healthy treats like soda, candy, and Doritos often seems inevitable. However, a delightful discovery a few weeks ago changed my snacking game entirely.
During a trip to Cincinnati, I serendipitously ordered a side of sweet potato chips. It might have been an accident, or perhaps fate, but from the very first bite, I was completely hooked! I genuinely can’t recall if I had ever tasted sweet potato chips before, but if I had, they certainly weren’t as incredibly delicious as these. Returning home, my culinary mission was clear: I had to recreate them. It took a few attempts, a little trial and error, but eventually, I perfected the recipe. These homemade sweet potato chips quickly became my go-to, the PERFECT study snack, and I’ll openly admit to having made more than a couple of batches over a single week. They’re not just a snack; they’re a revelation.
Why Sweet Potato Chips Are Your New Go-To Snack
Beyond their incredible taste and satisfying crunch, sweet potato chips offer a host of benefits that make them a superior snack choice, especially when homemade. Sweet potatoes are nutritional powerhouses, packed with essential vitamins and minerals. They are an excellent source of beta-carotene, which converts to Vitamin A in the body, crucial for vision and immune function. They also provide a good dose of Vitamin C, manganese, and dietary fiber, promoting digestive health and helping you feel fuller for longer.
Compared to their traditional potato chip counterparts, homemade sweet potato chips allow you to control every ingredient. You can choose high-quality oils, adjust the salt content to your preference, and avoid the artificial flavors and preservatives often found in store-bought options. This makes them a fantastic, healthier alternative that doesn’t compromise on flavor or satisfaction. Plus, the natural sweetness of sweet potatoes means you can enjoy them with just a sprinkle of salt for a savory treat, or a touch of cinnamon and sugar for a delightful dessert-like snack, offering incredible versatility.
The Secret to Perfectly Crispy Sweet Potato Chips: Precision and Patience
Achieving that coveted, satisfying crispness in homemade sweet potato chips boils down to two critical factors: the thickness of your slices and your willingness to be patient during the baking process. These aren’t just tips; they are the foundational principles for chip perfection.
1. Slice Them Ultra-Thin and Consistently
The thinner your sweet potato slices, the crispier your chips will be. Aim for about 1/16th to 1/8th of an inch – imagine paper-thin slices. This thinness allows the moisture to evaporate quickly, resulting in that delightful crunch. Moreover, consistency in thickness is paramount. If your slices vary wildly, you’ll end up with a mixed bag of results: some chips will be perfectly crisp, others disappointingly chewy, and some might even burn while their thicker counterparts remain undercooked. This inconsistency leads to uneven baking and a less enjoyable final product.
I wholeheartedly recommend investing in a mandolin slicer if you don’t already own one. It’s a game-changer for achieving uniform, super-thin slices quickly and safely. While even with a mandolin, a slight variation can occur, it’s significantly better than trying to achieve this precision with a knife. For those without a mandolin, a very sharp chef’s knife and a steady hand can work, but it will require more time and careful attention to detail. Just remember to proceed with caution when slicing!
Gather Your Simple Ingredients
One of the beauties of this recipe is its simplicity, requiring just a few basic ingredients to create something truly extraordinary. Quality ingredients will, of course, yield the best flavor.
Ingredients:
2 medium sweet potatoes, preferably uniform in shape, peeled and thinly sliced (1/8th of an inch or smaller)
2 tablespoons olive oil (or cooking spray)
1/2 teaspoon sea salt (or to taste, plus other desired flavorings)
Step-by-Step Directions to Crispy Perfection
Follow these detailed steps to bake your way to the best homemade sweet potato chips you’ve ever tasted.
Directions:
1. Preheat Your Oven: Begin by preheating your oven to a robust 450°F (232°C). A high oven temperature is crucial for achieving crispiness, as it helps to quickly evaporate the moisture from the sweet potato slices without making them soggy.
2. Prepare Your Sweet Potatoes: Thoroughly wash and peel your sweet potatoes. Then, using a mandolin slicer (highly recommended for uniform results) or a very sharp knife, carefully slice the sweet potatoes into rounds, aiming for a consistent thickness of no more than 1/8th of an inch. Remember, consistency is key for even baking!
3. Prep Your Baking Sheets: Line two large baking sheets with parchment paper or silicone baking mats. This prevents sticking and makes cleanup a breeze. Arrange the sweet potato slices in a single layer on the prepared baking sheets, ensuring they do not overlap. Overlapping slices will steam instead of crisp, resulting in soft, chewy chips.
4. Oil and Season: Lightly spray each side of the sweet potato slices with cooking spray, or drizzle with olive oil and gently toss to coat them evenly. Then, sprinkle generously with salt. For those with a sweet tooth, a delightful alternative is to sprinkle them with a mixture of cinnamon and a pinch of sugar – a truly addictive combination! Other savory options include a dash of smoked paprika, garlic powder, or even a sprinkle of chili powder for a spicy kick.
5. First Bake: Place the baking sheets in the preheated oven. Bake for 10 minutes. Keep a close eye on them, especially towards the end of this period, as oven temperatures can vary.
6. Flip and Finish: Carefully remove the baking sheets from the oven. Using tongs or a spatula, gently flip each sweet potato chip to ensure even browning and crispness on both sides. Return the baking sheets to the oven and continue to bake for an additional 7-10 minutes. This is where patience is key; continue to watch them closely. Some chips might crisp up faster than others due to slight variations in thickness or oven hot spots. They should be lightly golden brown and feel firm and crisp when gently lifted.
7. Cool and Enjoy: Once baked to perfection, remove the chips from the oven and let them cool on the baking sheets for about 10 minutes. This cooling period is vital; as they cool, the chips will continue to crisp up, transforming from slightly pliable to wonderfully crunchy. Resisting the urge to eat them immediately can be tough, especially when the aroma fills your kitchen! If you’re anything like me, you might find yourself repeatedly burning your fingers and tongue because the temptation to dive in before they’ve fully cooled is just too strong. But trust me, that extra cooling time is worth it for ultimate crispness!
Troubleshooting Common Issues for Perfect Chips
Even with the best instructions, sometimes things don’t go exactly as planned. Here are some common issues and how to resolve them:
- Soggy Chips: If your chips turn out soft or chewy, it’s likely due to slices being too thick, the oven temperature being too low, or overcrowding the baking sheet. Ensure your slices are uniformly thin, your oven is preheated to the correct temperature, and chips are in a single layer with space between them.
- Burnt Edges, Undercooked Centers: This often happens with inconsistent slicing. Thinner edges burn while thicker centers remain soft. Re-emphasize uniform slicing. It could also mean your oven is too hot or you left them in too long for their thickness.
- Uneven Browning: If some chips are perfectly golden while others are pale, it’s usually due to inconsistent slicing or hot spots in your oven. Rotating the baking sheets halfway through the baking process (when you flip them) can help with oven hot spots.
Unleash Your Creativity: Flavor Variations
While a simple salt seasoning is fantastic, sweet potato chips are incredibly versatile and lend themselves beautifully to various flavor profiles. Don’t be afraid to experiment!
- Sweet & Spicy: A dash of cayenne pepper combined with a sprinkle of brown sugar creates a thrilling sweet and spicy experience.
- Garlic Herb: Mix finely minced garlic powder with dried rosemary or thyme for an aromatic, savory twist.
- Chili Lime: A squeeze of fresh lime juice after baking, paired with a sprinkle of chili powder and a pinch of salt, offers a zesty kick.
- Smoky BBQ: A light dusting of smoked paprika, onion powder, and a tiny bit of brown sugar can evoke classic BBQ flavors.
- Everything Bagel: Sprinkle with everything bagel seasoning before baking for a savory, textural delight.
Serving Suggestions and Storage Tips
These homemade sweet potato chips are delicious on their own, but they also make a fantastic accompaniment to a variety of meals and dips. Serve them alongside your favorite sandwich instead of regular potato chips, or as a crunchy topping for salads and soups. They are excellent with a side of guacamole, hummus, or a simple Greek yogurt dip seasoned with herbs. The possibilities are endless!
For best results and maximum crispness, sweet potato chips are best enjoyed fresh out of the oven. If you have leftovers, store them in an airtight container at room temperature for up to 2-3 days. While they might lose a little of their initial crispness over time, a quick refresh in a warm oven (around 300°F/150°C) for a few minutes can often bring some of that crunch back.
The Perfect Snack Awaits You
There’s something incredibly satisfying about creating a delicious, healthy snack from scratch, especially one that rivals and often surpasses its store-bought counterparts. These homemade crispy sweet potato chips are not just a recipe; they’re a testament to how simple ingredients, a little precision, and a bit of patience can yield truly amazing results. They’ve been my savior during stressful study periods and have quickly become a household favorite. So, go ahead, grab some sweet potatoes, fire up your oven, and prepare to fall in love with your new favorite snack. Your taste buds (and your body) will thank you!