
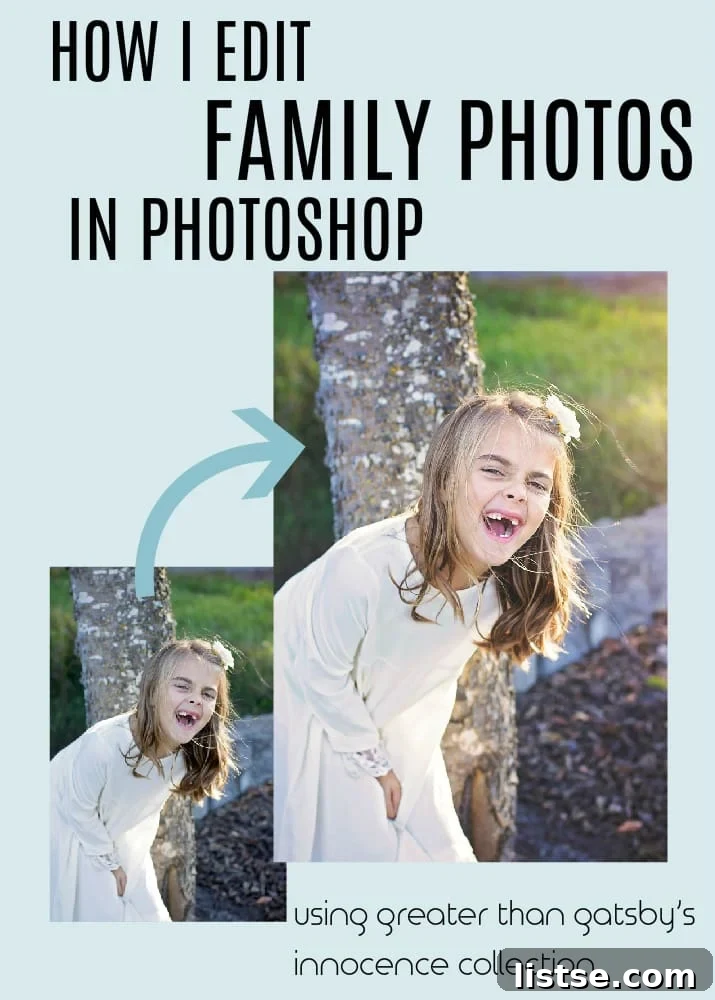
In the vast world of digital photography, transforming ordinary snapshots into captivating works of art often feels like a daunting task. For many, the complexities of photo editing software like Photoshop can be overwhelming, leading to frustration and abandoned projects. However, what if there was a powerful, yet incredibly simple solution that could unlock your photos’ full potential? Enter Greater Than Gatsby Photoshop Actions – a game-changer for photographers of all skill levels. Over the years, these actions have consistently proven to be an indispensable tool in my own editing workflow, helping me achieve stunning, professional-looking results with remarkable ease. Each year, as my photography skills evolve, so too does my appreciation for the continuous innovation and quality offered by Greater Than Gatsby, particularly their refined collections and new additions designed to streamline the editing process.
While Photoshop itself is a powerhouse capable of truly spectacular manipulations, my personal philosophy revolves around maintaining a natural, organic feel in my photographs. This means my “before and after” transformations, powered by Greater Than Gatsby Actions, aren’t about drastic alterations but rather about enhancing the inherent beauty of each image. It’s about bringing out vibrant colors, refining details, and adding that subtle, professional polish that elevates a good photo to a great one, all while preserving the authenticity of the moment captured. This approach ensures that your family photos and cherished memories look their absolute best, without appearing over-edited or artificial.
Understanding Photoshop Actions: A Gateway to Effortless Editing
At their core, Photoshop actions are a series of pre-recorded steps designed to execute a complex sequence of edits with a single click. Imagine performing a common set of adjustments on a photo: you might brighten the exposure, enhance the contrast, add a soft vignette, and boost the overall vibrance. Now, picture recording every one of those steps. With a Photoshop action, you simply hit “play,” and those exact same adjustments are automatically applied to any other photo. This automation is incredibly powerful, offering unprecedented efficiency and consistency in your photo editing workflow.
While Photoshop does allow users to create their own custom actions, this often requires extensive knowledge of the software’s myriad adjustments, layers, and masks, not to mention a considerable amount of patience. For most photographers, whether budding enthusiasts or seasoned professionals looking to save time, navigating these complexities can be a significant barrier. Greater Than Gatsby actions bridge this gap, offering meticulously crafted, professional-grade sequences that deliver exceptional results without the steep learning curve. They encapsulate years of editing expertise into user-friendly tools, allowing you to achieve sophisticated looks that might otherwise take hours of manual fine-tuning, thereby democratizing access to high-quality photo enhancements.
Who Can Benefit from Greater Than Gatsby Actions?
One of the most frequent questions I encounter is whether Greater Than Gatsby Actions and Presets are exclusively for professional photographers or if they cater to enthusiasts as well. My unequivocal answer is that these tools are designed for *anyone* who desires to effortlessly and beautifully elevate their photographs. Whether you’re a parent wanting to perfect everyday snapshots of your children, a hobbyist striving for a more polished portfolio, a blogger needing consistent imagery, or a professional aiming to streamline your workflow, Greater Than Gatsby offers a solution.
While a basic familiarity with Photoshop is beneficial – understanding concepts like layers, masks, and how to open and save files – you certainly don’t need to be an expert. When I first embarked on my journey with Greater Than Gatsby Actions, their comprehensive video tutorials served as an invaluable resource, guiding me through every step. These tutorials are thoughtfully designed to empower users, ensuring that even those new to Photoshop can quickly grasp how to implement the actions effectively. I’ve personally demonstrated the ease of use to numerous friends, particularly parents eager to enhance their family memories, and they’ve been consistently amazed at the professional quality they can achieve with minimal effort. As long as you have access to Photoshop (or Lightroom for their presets), Greater Than Gatsby provides the perfect platform to transform your images.
A Step-by-Step Guide to Editing with the Innocence Collection
Let’s dive into a practical demonstration of how I achieve quick yet impactful edits using the Greater Than Gatsby Innocence Collection. This particular collection is masterfully crafted for enhancing photographs of children and families, bringing out their natural warmth and charm. Lately, it has become my go-to for all my family portraiture, offering a versatile range of options for diverse lighting and moods. The Innocence Collection focuses on creating clean, timeless, and emotive images that truly capture the spirit of childhood.
Here’s the initial photograph we’ll be working with. This image is SOOC, which stands for “straight out of the camera,” meaning no adjustments or enhancements have been applied yet. It’s a clean slate, ready for its transformation:
Our journey begins in Photoshop. After opening your chosen image, navigate to the “Actions” panel. If it’s not visible, simply click “Window” in the top menu bar and ensure “Actions” is checked. Within this panel, you’ll find the organized folders, including the “Innocence Workflow.” This streamlined structure makes finding the right action incredibly intuitive, ensuring a smooth editing experience.
Should your image require initial adjustments for exposure or skin imperfections, the Innocence Retouch Actions offer targeted solutions. These can be incredibly useful for correcting underexposed or overexposed areas, smoothing out skin tones, or tidying up minor details like flyaway hairs. While I don’t use these every time, they are a powerful asset for specific corrections, allowing for a pristine base before applying creative enhancements.
My preferred starting point, almost without exception, is one of the “Complete Workflow Color Bases.” These foundational actions apply fundamental edits, typically brightening the image, sharpening key details, and most importantly, making all the colors truly pop. They set the stage for subsequent artistic enhancements, providing a clean and vibrant canvas.
For this particular photo, I selected the “Imagination Color Base,” which Greater Than Gatsby describes as “clean and crisp.” This action brightens the overall image while enhancing contrast and saturation in a balanced way, creating a fresh and inviting feel. To apply it, simply click on the desired action in the panel and press the “play” button located at the bottom of the actions window. The magic happens instantly, transforming the image with a single click and laying down a beautiful color foundation.
Next, I move on to adding 1-2 artistic enhancements. While the collection offers incredible depth for dramatic effects, I usually opt for a more subtle touch to maintain that organic look. Here, I chose “Polar Express,” which imparts a cool, dreamy tone to the image. A crucial technique when applying these enhancements is to “brush the action off” the main subject, especially their skin tone. This ensures the creative effect applies to the background and surroundings, enhancing the mood without altering the natural complexion of the person. Greater Than Gatsby’s comprehensive tutorials provide excellent guidance on mastering this technique, which involves using layer masks effectively.
Finally, I sometimes incorporate additional elements like “movable color” or a subtle vignette to finalize the image. For this demonstration, I’ll add these to showcase the possibilities, though my goal remains a natural aesthetic. The Innocence Collection is particularly rich in options for adding natural bursts of light, which can beautifully simulate sunlight or other ambient light sources. The key is placement: always ensure the light burst appears organic, originating from a believable source, enhancing the photo’s natural dimensionality.
While I considered a movable color, I ultimately decided against it for this particular image, opting instead for a very subtle “Tuscan” vignette, which gently darkens the edges and draws focus to the center. To add a final artistic touch, I then applied a “Matte: Stone Soup” finish, which softens the overall contrast and lends a beautiful, painterly quality to the photograph. This combination creates a sophisticated yet understated elegance, perfectly complementing the initial color base and artistic enhancement.
Witnessing the transformation side-by-side truly highlights the power of these actions. Here’s the before and after:
The changes are subtle, yet profoundly impactful. The photograph now possesses an added depth, vibrancy, and a professional sheen that makes all the difference, transforming a simple shot into a cherished memory with that unique, special touch.
Another Example: Enhancing a Bright Outdoor Portrait
Let’s consider another photograph, again presented SOOC, showcasing its original state before any enhancements. This image has great potential, but could benefit from some thoughtful refinement to make it truly shine:
Similar to our first example, I began by applying the “Imagination Color Base.” This action immediately imbues the image with its signature clean and crisp qualities, enhancing the colors and overall brightness without pushing them too far. It provides a beautiful, naturalistic foundation that respects the original lighting and mood of the scene.
Following the color base, I introduced a couple of artistic enhancements to further refine the aesthetic. To add a touch of warmth and vibrancy, I also incorporated a “movable light” effect, specifically “Pastel Coral,” positioned in the upper right portion of the photograph. This subtle addition simulates a soft, golden hour glow, enhancing the overall ambiance and drawing the eye gently towards the subject. The beauty of these movable light options is their flexibility, allowing you to intuitively guide the viewer’s attention and create an inviting atmosphere.
Here’s the striking before and after comparison for this second example:
Once again, the transformation is a testament to the power of subtle, well-applied edits. The image now feels warmer, more inviting, and boasts a depth that was absent in its original state, proving that even minor adjustments can yield significant visual improvements.
Final Example: Rescuing a Challenging Shot
For our last demonstration, let’s tackle a more challenging scenario: a photograph taken with my DSLR by a family member entirely new to professional cameras. As expected, the SOOC image is a little dull and lacks the vibrancy we aim for, but it serves as a perfect canvas to showcase the corrective and enhancing capabilities of Greater Than Gatsby actions:
For this image, I employed a similar, yet tailored editing strategy. I started with the “Emotional Color Base,” which is designed to infuse photographs with a rich, evocative mood while correcting color balance. Following this, I layered two artistic enhancements: “Teddy Ruxpin” and “Giving Tree.” As with previous examples, I carefully brushed both of these actions off the main subject to ensure their skin tones remained natural and unaffected by the creative overlays. This selective application is crucial for achieving a polished, professional look where the effects complement rather than overpower the subject.
To further enhance the warmth and atmosphere, I added the “Vivid: Pumpkin” movable light in the upper right-hand corner. This specific movable light option introduces a golden, autumnal glow, perfectly complementing the subject and bringing a delightful vibrancy to the overall scene. The combination of a strong color base, carefully applied artistic enhancements, and a strategically placed light burst effectively transforms the initially flat image into a lively and engaging portrait.
Once again, the outcome is a subtle yet significant revival of the photo. The once dull image now radiates with life and energy, the colors pop, and the overall mood is dramatically improved. This final example powerfully illustrates how Greater Than Gatsby actions can not only enhance well-shot images but also effectively rescue and elevate photos that might otherwise be considered less than perfect, making them truly memorable.
Why Greater Than Gatsby Stands Out
In a saturated market of Photoshop actions and Lightroom presets, Greater Than Gatsby has consistently distinguished itself through its unwavering commitment to quality, artistic vision, and user-friendly design. Their collections, like the Innocence Collection, are not just random bundles of effects; they are meticulously crafted workflows that cater to specific photographic styles and needs. This dedication results in actions that produce consistent, beautiful results, helping photographers develop a signature look with ease.
Beyond the aesthetic appeal, the technical design of Greater Than Gatsby actions is commendable. They are typically built using non-destructive layers, meaning every adjustment is editable, allowing for maximum flexibility and control. This empowers users to fine-tune any applied effect, adjusting opacity, blending modes, or even masking out specific areas, ensuring the final image perfectly matches their vision. This level of professional craftsmanship, combined with accessible tutorials, makes Greater Than Gatsby an unparalleled resource for anyone serious about elevating their photo editing game without needing to be a Photoshop guru.
Maximizing Your Results: Tips for Using Photoshop Actions Effectively
While Greater Than Gatsby actions are incredibly intuitive, a few strategic tips can help you unlock their full potential and achieve truly exceptional results:
- Understand Layers and Masks: Actions often create multiple layers. Familiarize yourself with how to adjust the opacity of a layer to control the intensity of an effect, and learn to use layer masks to selectively apply or remove effects from specific areas of your photo, as demonstrated in our examples. This is key to maintaining natural skin tones and overall image balance.
- Start with a Solid Base: Ensure your original photo is as good as it can be straight out of the camera (SOOC). While actions can fix many issues, starting with a well-exposed and composed image will always yield superior results.
- Experiment with Opacity: Don’t be afraid to reduce the opacity of an action’s layer group if the effect feels too strong. Subtle enhancements often create the most professional and pleasing outcomes.
- Layer Actions Thoughtfully: Many collections are designed with a specific workflow in mind (e.g., color base first, then artistic enhancements). Follow these recommendations, but also experiment with layering different actions, keeping an eye on the overall balance and harmony of the image.
- Watch the Tutorials: Greater Than Gatsby provides excellent video tutorials. Investing a little time to watch these will significantly enhance your understanding and mastery of their actions.
Investing in Your Photography Future
While specific sales and giveaways are often seasonal, Greater Than Gatsby frequently offers promotions and new collections. It’s always a good idea to check their official website or social media channels for the latest updates on discounts, new product releases, and educational content. Investing in high-quality Photoshop actions like those from Greater Than Gatsby is an investment in your photographic skill and efficiency. They save countless hours of manual editing, provide consistent, professional results, and empower you to focus more on capturing beautiful moments rather than getting bogged down in post-processing.
Final Thoughts and Recommendation
In conclusion, my enthusiasm for Greater Than Gatsby Photoshop actions remains unwavering. They are an indispensable tool that I wholeheartedly recommend to anyone looking to elevate their photography, regardless of their current skill level. Their ease of use, combined with the professional-grade results they deliver, makes them a standout choice in the world of photo editing. If you’ve been searching for a way to improve your images without needing extensive Photoshop or Lightroom expertise, these actions provide a remarkably simple and effective solution. Feel free to reach out with any questions; I’m always happy to share more about how these actions have transformed my own editing experience.
*This post contains affiliate links. This means that if you click on one of the product links provided and proceed to make a purchase, I may receive a small commission at no additional cost to you. Please rest assured, I only recommend products that I genuinely use and love. I purchased these actions with my own funds and have relied on them daily for an extended period, which is why I confidently endorse them.