
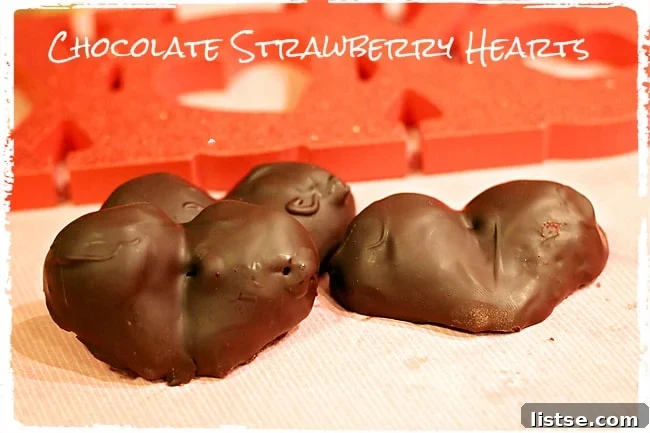
Melt Hearts This Valentine’s Day: Easy DIY Heart-Shaped Chocolate Covered Strawberries
Valentine’s Day is just around the corner, a time when expressions of love often take a delicious form. While I wouldn’t call myself a master chef, my passion for creating visually appealing and heartwarming treats is undeniable. I find immense joy in sharing simple, delightful recipes that anyone can conquer, regardless of their culinary experience. This year, why not skip the store-bought sweets and create something truly special and memorable? These heart-shaped chocolate-covered strawberries are not only incredibly easy to make but also serve as a thoughtful, personalized gift that’s sure to impress.
There’s a unique charm in combining something naturally wholesome like fresh strawberries with the decadent indulgence of rich chocolate. Call it a delightful deception, but I’ve found that pairing a “healthy” fruit with a luscious chocolate coating makes me feel wonderfully virtuous. It’s my little secret to enjoying a sweet treat while still feeling like I’m getting my daily dose of fruit – and who can argue with that logic, especially when the result is this delicious?
As a devoted fan of classic chocolate-covered strawberries, I wanted to add a charming, romantic twist just in time for Valentine’s Day. The heart shape transforms this beloved treat into a perfect symbol of affection, making it ideal for your sweetheart, friends, or even a delightful self-indulgence. In fact, my husband has already put in multiple requests for these beauties come February 14th, which I take as a glowing endorsement!
Why Choose Homemade Heart-Shaped Chocolate Strawberries?
Opting for homemade treats offers several advantages. Firstly, you control the quality of ingredients, ensuring freshness and your preferred type of chocolate. Secondly, the act of preparing them yourself adds a personal touch that no store-bought gift can replicate. It’s a gesture that speaks volumes, showing care, effort, and affection. Lastly, the unique heart shape makes them extra special for romantic occasions, far beyond a simple dip.
Gather Your Simple Ingredients & Tools
The beauty of this recipe lies in its simplicity. You don’t need a gourmet pantry or specialized equipment. Here’s what you’ll need to create these enchanting edible hearts:
- 8-12 ounces of high-quality baking chocolate: I personally love using Ghirardelli baking bars for their smooth melt and rich flavor, but feel free to choose your favorite dark, milk, or even white chocolate. Quality chocolate makes a significant difference in both taste and texture.
- Approximately 15 fresh strawberries: A standard container from your local market should suffice. Look for firm, ripe strawberries with a vibrant red color. Larger strawberries tend to create more pronounced heart shapes.
- Toothpicks: These humble tools are the secret to holding your strawberry hearts together as they set.
Essential Equipment:
- Baking rack: Crucial for allowing excess chocolate to drip off, ensuring a neat finish.
- Parchment paper or wax paper: Place this underneath your baking rack to catch drips and prevent sticking when you transfer the finished strawberries.
- Double boiler: While other methods exist, a double boiler is ideal for melting chocolate gently and evenly, preventing scorching. If you don’t have one, a heatproof bowl set over a pot of simmering water works perfectly.
Crafting Your Strawberry Hearts: A Step-by-Step Guide
Step 1: Preparing the Strawberries
Start by thoroughly washing and gently drying your strawberries. Excess moisture can cause the chocolate to seize or not adhere properly. Once clean and dry, carefully cut the green tops (hulls) off each strawberry. Then, using a sharp knife, slice each strawberry evenly in half, lengthwise. The trick to perfect heart shapes is to keep the two halves of each individual strawberry together. This ensures they align beautifully to form a symmetrical heart.
Step 2: Forming the Heart Shapes
Now for the magic! Place your prepared strawberry halves on a baking rack lined with parchment paper below. Take the two halves of a single strawberry and carefully position their cut sides together, forming the distinct V-shape at the top that defines a heart. If you want a more rounded look, you can gently trim a small amount off the outer edges of the strawberries, but I found mine looked charming just as they were. The slight variations add to their homemade appeal.
Step 3: Securing the Hearts
To ensure your strawberry hearts hold their shape beautifully during the chocolate coating process, use a toothpick to pin the two halves together. Gently push a toothpick through the widest part of the heart, connecting both halves securely. This creates a stable base for dipping and ensures your hearts remain intact. While the strawberries are subtly drying out on the rack, you can move on to preparing the star of the show: the chocolate.
Step 4: Melting the Chocolate to Perfection
Now, it’s time for the chocolate. Break your chosen baking chocolate into smaller, uniform pieces. This helps it melt more quickly and evenly. Try your best to resist the urge to snack on all of it before it hits the pot – a true test of willpower!
The best way to melt chocolate is using a double boiler. If you don’t have a dedicated double boiler, simply place a heatproof bowl (glass or stainless steel) over a pot of simmering water, ensuring the bottom of the bowl does not touch the water. The steam will gently and gradually melt the chocolate without direct heat, preventing it from burning or seizing. This method yields a perfectly smooth, glossy consistency.
Continuously stir the chocolate as it melts. You’re aiming for a temperature between 100°F and 120°F (38°C to 49°C) – never exceed 120°F (49°C), as higher temperatures can cause the chocolate to burn or become grainy. Keep stirring until it reaches a luxuriously creamy, smooth, and pourable consistency. Patience is key here; a perfectly melted chocolate will ensure a beautiful finish on your strawberries.
Step 5: Coating Your Strawberry Hearts
This is where the transformation truly happens! While I initially attempted to “dollop” the chocolate onto the strawberries with a spoon, leading to a slightly uneven finish, I highly recommend dipping them if you can. Hold the strawberry heart by the toothpick, carefully submerge it into the melted chocolate, and gently swirl to ensure complete coverage. Lift it out, allowing any excess chocolate to drip back into the bowl. This method generally yields a smoother, more elegant coating.
As you place the coated strawberries back on the baking rack, don’t worry about the chocolate dripping through. This excess chocolate is a fantastic bonus! It hardens into delicious, irregularly shaped pieces – perfect for a chef’s taste test while you wait for the main event to set. Consider it a reward for your hard work!
Step 6: Setting and Finishing
Before the chocolate completely dries on the strawberries, carefully remove the toothpicks. If you wait too long, the chocolate might crack. Once the toothpicks are out, gently transfer each chocolate-covered strawberry heart onto a clean sheet of parchment paper. This prevents them from sticking to the rack as they fully harden. Place them in the refrigerator for about 15-30 minutes, or until the chocolate is completely set and firm. Once hardened, they are ready to be enjoyed!
Tips for Perfection & Delicious Variations
To truly elevate your heart-shaped chocolate strawberries, consider these enhancements and tips:
- Decorative Touches: While I didn’t try it myself this time, imagine how festive these would look with some Valentine’s Day themed sprinkles immediately after dipping, before the chocolate sets! Or, drizzle them with contrasting white chocolate for an elegant swirl effect.
- Flavor Boosts: For an extra layer of flavor, add a tiny pinch of sea salt to your melted chocolate, or a few drops of pure vanilla extract. A hint of orange zest or a liqueur like Grand Marnier can also add a sophisticated twist.
- Storage: Store your finished chocolate-covered strawberries in an airtight container in the refrigerator. They are best enjoyed within 1-2 days for optimal freshness and texture.
- Troubleshooting Chocolate: If your chocolate seems too thick, you can thin it out with a teaspoon of neutral oil (like coconut or vegetable oil) or a bit of cocoa butter. If it seizes (becomes grainy and clumpy), it likely got too hot or came into contact with water. Unfortunately, seized chocolate is difficult to rescue for dipping, so prevention through a double boiler is key.
Share the Love and the Recipe!
These heart-shaped chocolate-covered strawberries are more than just a dessert; they’re a delightful gesture, a sweet treat that evokes warmth and care. Whether you’re making them for a romantic partner, a beloved friend, or simply to treat yourself, the process is as rewarding as the delicious outcome. They’re perfect for Valentine’s Day, anniversaries, birthdays, or any occasion that calls for a little extra love.
I truly immerse myself in the joy of holiday-themed foods, so keep an eye out for more creative and heartfelt recipes coming your way! If you try this recipe, I would absolutely love to see your creations. Don’t hesitate to share your pictures and experiences – let’s inspire each other to make every meal a “food with feeling” moment.