
Mastering the Authentic Traditional Cornish Pasty: A Culinary Journey to Cornwall
Embark on a delightful culinary adventure right in your kitchen as we uncover the secrets to crafting the perfect Traditional Cornish Pasty. This iconic British hand pie, renowned for its golden, flaky crust and savory filling, offers a taste of Cornwall’s rich heritage with every bite. If you’ve ever dreamt of recreating the rustic charm of this beloved dish at home, you’ve come to the right place. We’re about to share a meticulously developed recipe that promises an authentic flavor experience, bringing the true essence of the Cornish Pasty directly to your table.
The journey to perfecting these pasties has been a labor of love, a collaborative effort born from a shared passion for traditional British fare. While the initial plan was for me to lead the charge, the intricate nuances of crafting the ideal crust and selecting the finest ingredients for the filling quickly captivated my partner, Stephen. He wholeheartedly embraced the mission, transforming it into his personal quest for pasty perfection. And honestly, I couldn’t complain – being cooked for is always a treat! So, I happily took on the role of photographer, documenting every step of this delicious endeavor.
A Taste of History: The Story Behind the Cornish Pasty
For those unfamiliar with the “pasty,” it’s much more than just a hand pie; it’s a culinary emblem of Cornwall, a region nestled in the southwestern tip of England. While you can now find variations across England, its roots are deeply embedded in Cornish mining history. Traditionally, these portable parcels were the sustenance of choice for miners. Designed to be a complete meal, they were hearty, easy to carry, and, most ingeniously, had a thick crimped edge that served as a “handle.” Miners, often with hands covered in dirt or arsenic from the mines, could hold the pasty by this crust, eating the clean filling and discarding the handle afterward.
Legend has it that early pasties sometimes even featured a savory filling at one end and a sweet filling (like fruit) at the other, offering a main course and dessert all in one convenient package. This ingenious design allowed the workingman to enjoy a full, satisfying meal without needing separate containers or cutlery. We contemplated experimenting with this dual-filling concept for a moment, but ultimately, decided to focus on perfecting the classic savory rendition first. The rich heritage and practical brilliance of the Cornish Pasty truly speak volumes about its enduring appeal.
What Makes a Cornish Pasty Authentic?
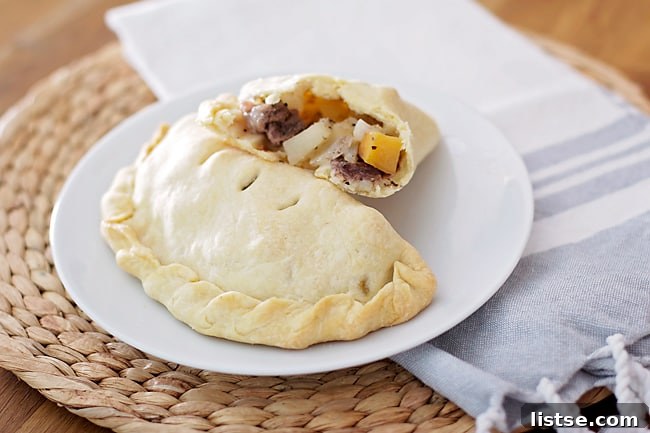
We are incredibly proud of how closely our homemade Cornish Pasties resemble and taste like the ones we savored during our visit to Cornwall. The secret to an authentic Cornish Pasty lies in its specific ingredients and preparation method. Traditionally, these pasties are made with thinly sliced or finely cubed beef (often skirt steak or chuck steak), diced potatoes, robust onions, and either rutabaga (also known as swede) or sometimes carrots. These core ingredients combine to create a deeply satisfying, flavorful filling that cooks perfectly within the pastry shell.
It’s worth noting that a truly “Traditional Cornish Pasty” holds Protected Geographical Indication (PGI) status in the European Union, meaning it must be made in Cornwall to a specific recipe. Our recipe aims to capture that authentic flavor profile and experience, even if made outside the region. While in Cornwall, I also had the pleasure of trying an onion and cheese pasty, which was absolutely delightful! That particular variation is definitely on my list to recreate soon, showcasing the versatility of this beloved hand pie. But for today, we’re sticking to the time-honored classic.
Crafting the Perfect Pasty: Our Detailed Recipe Guide
Let’s dive into the heart of the matter – making these incredible hand pies. The process can be broken down into three main stages: preparing the pastry, assembling the savory filling, and finally, folding and baking your pasties to golden perfection.
The Foundation: A Flaky, Buttery Pasty Crust
The crust is paramount to a truly exceptional Cornish Pasty. While store-bought crusts can be a shortcut, taking the time to make your own yields unparalleled results in terms of flavor and texture. Our recipe features a rich, flaky pastry that perfectly encases the hearty filling. The secret lies in using very cold fats and minimal handling.
To begin, you’ll combine flour with cold butter and lard. The key here is the “cold” butter. Keeping the fats cold prevents them from fully incorporating into the flour, instead forming small pockets that melt during baking, creating those desirable flaky layers. While there’s a technical explanation involving gluten development, for now, let’s just focus on the delicious outcome!
A dash of salt is also essential, enhancing the overall flavor of the crust and balancing the richness of the filling.
Once the butter and lard are thoroughly coated with flour, it’s time to slowly introduce ice water. This gradual addition, while continuously combining the ingredients, is crucial. You’re looking for a dough that is firm yet not sticky, typically requiring around 3/4 cup of water. Be mindful not to overwork the dough; excessive handling can develop gluten too much, leading to a tough crust rather than a tender, flaky one.
After your dough comes together, gently form it into a rectangular shape, similar to a loaf of bread, on a piece of parchment paper. This shape makes it easier to divide later. Then, wrap it and refrigerate for at least an hour. This chilling period is vital; it allows the gluten to relax, and the fats to firm up, making the dough much easier to roll out and contributing significantly to the final flaky texture.
The Heart of the Pasty: A Rich and Savory Filling
With your pastry dough chilling, it’s time to prepare the delectable filling. Precision in cutting your ingredients is key here. You’ll need to finely cube your onion, rutabaga (or swede), potato, and steak. The goal is to cut them as small as your patience allows, ideally around 1/2-inch pieces. Smaller pieces ensure that all ingredients cook evenly and thoroughly within the pasty, and they meld together beautifully in terms of flavor and texture.
The choice of steak is crucial; skirt steak or chuck steak are excellent options as they become wonderfully tender and flavorful during the slow baking process. The potatoes provide a comforting bulk and absorb flavors, while the rutabaga adds a subtle sweetness and earthy depth. Onions, of course, are essential for that classic savory base. Mixing all these ingredients in a bowl beforehand ensures an even distribution of flavors in each bite.
Assembling Your Cornish Masterpiece: Step-by-Step
Once both your dough is chilled and your filling is prepared, it’s time for the exciting part: assembling your Cornish Pasties.
1. **Divide the Dough**: Take your chilled dough out of the fridge and cut it into 6 equal pieces. If you prefer smaller pasties, you can divide it into more chunks. Allow these portions to sit for a few minutes at room temperature; this slight warming will make them easier to roll.
2. **Roll the Dough**: On a lightly floured surface, take one section of dough and roll it out into a circle approximately 9 inches in diameter. Don’t worry if it’s not perfectly round; you can trim uneven edges later if desired, though it’s often not necessary for rustic charm.
3. **Add the Filling**: Now for the exciting part – the filling! We initially found one full cup to be a bit too much, leading to overstuffed pasties. Experiment slightly, but aiming for just under a cup of filling per pasty usually works best. Position the filling on one half of the rolled pastry circle, leaving a clear border around the edge for sealing.
4. **Season and Dot with Butter**: Sprinkle the filling generously with salt and pepper to taste. Then, place a small piece (about half a tablespoon) of butter directly on top of the filling. This butter will melt during baking, creating a rich gravy that permeates the filling and adds incredible moisture and flavor.
5. **Seal the Edges**: Around the edge of the pastry that surrounds your filling, lightly brush the dough with milk. This acts as a natural glue, helping the edges stick together firmly. Gently fold the empty half of the pastry over the filling, creating a semi-circle. Carefully press down along the edges to seal them, ensuring no filling escapes.
6. **Trim (Optional)**: If you find you have an excess of dough or very uneven edges after sealing, you can trim them with a knife or pastry wheel. However, this step is purely for aesthetics and not strictly necessary.
7. **The Signature Crimp**: This is arguably the most distinctive and traditional part of a Cornish Pasty. The crimped edge isn’t just for looks; it helps seal the pasty perfectly and forms the historic “handle.” Explaining this technique in writing can be tricky, so we highly recommend watching this video tutorial, which clearly demonstrates how to achieve the classic twisted crimp. The basic idea is to fold small sections of the edge over each other, creating a rope-like seal all the way around. With a little practice, you’ll master it!
8. **Prepare for Baking**: Place all your assembled pasties (or as many as will fit comfortably) onto a baking sheet lined with parchment paper. Parchment paper prevents sticking and makes for easy cleanup. Slice a few small holes or slits in the top of each pasty with a sharp knife; this allows steam to escape during baking, preventing the pasties from bursting. If you desire a deeper golden color and a slightly shiny finish, you can brush the tops of each pasty with an egg wash (a whisked egg with a splash of milk or water). While I personally prefer them without, many people find this addition appealing.
Baking to Golden Perfection and Enjoying Your Pasty
All that’s left now is to bake your glorious creations! Preheat your oven to 400 degrees Fahrenheit (200°C). Bake the pasties for approximately 20 minutes, or until their crusts achieve a beautiful, inviting golden-brown color. The aroma filling your kitchen will be absolutely irresistible.
Once baked, remove them from the oven and let them cool for several minutes. This cooling period is important, not just to prevent burning your mouth, but also to allow the filling to set and the flavors to fully meld. Trust us, the wait is worth it!
I must reiterate, the final result was incredibly satisfying! The pasties turned out exactly as we had hoped – a perfect balance of flaky pastry and a rich, savory filling. If you attempt this recipe, please, please send us pictures of your delicious creations! We love seeing your culinary adventures.
Full Recipe: Traditional Cornish Pasties
Ingredients:
For the Flaky Pastry Dough:
- 1 stick (8 tablespoons or 113g) cold unsalted butter, cubed
- 2/3 cup (150g) lard or vegetable shortening, chilled if possible
- 3 cups (360g) all-purpose flour
- Approximately 1 cup (240ml) ice-cold water
- Pinch of salt
For the Hearty Filling:
- 1 pound (450g) skirt steak (or chuck steak), finely cubed (approximately 1/2-inch pieces)
- 1 medium potato (about 1 cup or 150g), finely cubed
- 1 cup (150g) rutabaga (swede), finely cubed (alternatively, use carrots)
- 1 cup (100g) onion, finely chopped
- Salt and freshly ground black pepper, to taste
- Approximately 3 tablespoons unsalted butter, cut into small pieces
For Assembly & Finish:
- Milk, for brushing edges
- 1 large egg, whisked with a splash of water or milk (for optional egg wash)
Instructions:
Prepare the Flaky Pastry Dough:
- In a large mixing bowl, combine the all-purpose flour and a pinch of salt. Add the cubed cold butter and lard (or shortening). Using your fingertips or a pastry blender, cut the fats into the flour until the mixture resembles coarse crumbs with some pea-sized pieces of butter remaining.
- Gradually pour in the ice-cold water, a few tablespoons at a time, while continuing to combine the ingredients gently. Mix until the dough comes together and is firm but not sticky. Avoid overworking the dough to ensure a tender crust. You might not need all the water, or you might need a tiny bit more; adjust as necessary.
- Once combined, transfer the dough onto a piece of parchment paper. Gently form it into a rectangular shape, similar to a small loaf of bread. Wrap the dough tightly in parchment paper or plastic wrap and refrigerate for at least 1 hour (or up to 2 days) to allow it to chill and relax.
Prepare the Hearty Filling:
- In a large bowl, combine the finely cubed steak, potato, rutabaga, and onion. Mix thoroughly to ensure an even distribution of ingredients. This mixture will be seasoned later during assembly.
Assemble Your Cornish Pasties:
- Preheat your oven to 400°F (200°C). Line a large baking sheet with parchment paper.
- Remove the chilled pastry dough from the fridge. Cut it into 6 equal chunks (or more if you prefer smaller pasties). Let the dough pieces sit for a few minutes to soften slightly, making them easier to roll.
- On a lightly floured surface, take one chunk of dough and roll it out into a circle approximately 9 inches (23 cm) in diameter.
- Position slightly less than a cup of the prepared filling onto one half of the rolled pastry circle, leaving a clear border of about 1 inch (2.5 cm) around the edge.
- Sprinkle the filling generously with salt and freshly ground black pepper. Place a small piece of butter (about 1/2 tablespoon) on top of the filling.
- Lightly brush the exposed edge of the dough (the half without filling) with a little milk. This will help create a strong seal.
- Gently fold the empty half of the pastry over the filling, creating a semi-circle. Carefully press down along the edges to seal them firmly, ensuring no gaps.
- Now, for the traditional crimp: Starting from one end, fold small sections of the sealed edge over themselves, twisting and pinching to create a decorative rope-like pattern all the way around the curved edge. If you find this challenging, refer to this video tutorial for a visual guide.
- Using a sharp knife, make 2-3 small slits on the top of each pasty to allow steam to escape during baking.
- Transfer the assembled pasties to your parchment-lined baking sheet. If desired, brush the tops of the pasties with the egg wash for a golden sheen.
Bake and Serve:
- Bake in the preheated oven for about 20-25 minutes, or until the pastry is beautifully golden brown and the filling is tender and cooked through. Baking time may vary depending on your oven and the thickness of your pasties.
- Remove from the oven and allow the pasties to cool for at least 10-15 minutes on the baking sheet before handling and eating. They are quite hot straight out of the oven, and the filling needs time to set.
- Enjoy your homemade Traditional Cornish Pasties!
Tips for the Best Homemade Cornish Pasties
To ensure your Cornish Pasties are nothing short of spectacular, here are a few additional tips:
- Keep it Cold: Always use very cold butter and ice water for the pastry dough. This is the secret to a wonderfully flaky crust.
- Don’t Overwork the Dough: Handle the dough as little as possible to prevent gluten development, which can lead to a tough crust.
- Finely Dice Ingredients: Uniformly small pieces for the filling are crucial for even cooking and a cohesive texture.
- Season Generously: Don’t be shy with salt and pepper in the filling, as the raw ingredients need ample seasoning to shine. The small piece of butter added to the filling also makes a huge difference in richness and moisture.
- Practice the Crimp: The crimping technique takes a bit of practice, but it’s a signature feature. Don’t get discouraged if your first attempts aren’t perfect; they’ll still taste amazing!
- Freezing for Later: A fantastic “fun fact” about these pasties is how well they freeze, either before or after baking. To freeze raw pasties, place them on a baking sheet and freeze until solid, then transfer to an airtight freezer bag for up to 3 months. When ready to bake, place them directly from frozen onto a baking sheet (no need to thaw) and bake at 375°F (190°C) for 45-60 minutes, or until golden and cooked through. To freeze cooked pasties, allow them to cool completely, then wrap individually and freeze. Reheat in a moderate oven until warmed through. This makes them perfect for quick, hearty lunches or dinners!
Share Your Cornish Pasty Creation!
We absolutely adore seeing your culinary masterpieces! If you try this traditional Cornish Pasty recipe, please take a picture and share it with us. You can tag us on Twitter (@bbritnell) or Instagram (@b.britnell). Your creations inspire us, and we can’t wait to see your take on these delicious hand pies!