
Vibrant & Delicious Roasted Beet Hummus: Your New Favorite Healthy Dip
There’s an undeniable joy in culinary exploration, especially when it leads to discovering new favorite recipes. As a food enthusiast, I’m always on the lookout for unique ingredients and fresh ways to transform everyday dishes. This journey often introduces me to unexpected gifts from friends and family – whether it’s an abundance of homegrown produce or interesting kitchen gadgets. These thoughtful contributions often spark inspiration, pushing me to experiment and create something truly special for my kitchen and, of course, for all of you.
One such delightful instance recently brought a generous bag of vibrant, earthy beets into my fridge. Beets, with their striking color and sweet, earthy flavor, are incredibly versatile. While often relegated to salads or side dishes, I saw an opportunity to infuse their goodness into a beloved staple: hummus. The idea of a bright pink, flavorful dip immediately captured my imagination, promising a fresh take on a classic.
Why You’ll Love Roasted Beet Hummus
This isn’t just any hummus; it’s a celebration of color, flavor, and nutrition. Roasted beet hummus stands out for several compelling reasons:
- Stunning Visual Appeal: The natural pigments of roasted beets transform this dip into a magnificent, eye-catching magenta or deep pink, making it a showstopper on any table.
- Earthy Sweetness: Roasting beets caramelizes their natural sugars, intensifying their sweetness and creating a depth of flavor that beautifully complements the savory notes of traditional hummus ingredients.
- Nutritional Powerhouse: Beets are packed with essential vitamins and minerals, including folate, manganese, potassium, iron, and vitamin C. They are also rich in antioxidants and nitrates, which can support heart health. Combined with the protein and fiber from chickpeas, this dip is incredibly nourishing.
- Versatility: Beyond a simple dip, this roasted beet hummus can elevate sandwiches, wraps, salads, and even act as a vibrant spread for toast.
- Easy to Make: Despite its gourmet appearance, this recipe is straightforward and requires minimal effort, mostly hands-off roasting time.
The Inspiration Behind the Recipe
The concept of incorporating beets into hummus isn’t entirely new, but my approach was to blend the best of both worlds. I adore the creamy simplicity of a classic chickpea hummus recipe, and I wasn’t looking to reinvent the wheel entirely. Instead, I envisioned enhancing that familiar flavor profile with the unique character of roasted beets. The goal was to create a harmonious balance where the beets add color and a subtle earthy sweetness without overpowering the traditional hummus taste we all cherish. This recipe does exactly that – it’s a familiar comfort with an exciting, vibrant twist.
The Art of Roasting Beets: Unlocking Flavor and Color
The secret to truly spectacular beet hummus lies in the roasting process. Roasting brings out the beets’ inherent sweetness and softens their texture, making them easy to blend into a smooth, creamy dip. This step is crucial for both flavor development and achieving that gorgeous color.
Step-by-Step Guide to Perfect Roasted Beets
To begin, select about 2-3 medium-sized beets. If you prefer a more subtle beet flavor but still desire the beautiful pink hue, a single small beet will suffice. For those who can’t get enough of that earthy sweetness, feel free to add more – no judgment here!
Start by washing your beets thoroughly and trimming off the greens and any root ends. You can peel them before roasting, but I often find it easier to peel them after they’ve cooked and cooled slightly, as the skins slip off effortlessly.
Wrap your prepared beets snugly in aluminum foil with a drizzle of olive oil. The olive oil helps prevent them from drying out and enhances the flavor. This foil packet creates a steamy environment, ensuring the beets cook evenly and become incredibly tender.
Bake them at 375 degrees F (190 degrees C) for approximately 45 minutes to an hour. The exact cooking time will depend on the size and freshness of your beets. You’ll know they’re perfectly done when a fork slides into them with the same ease as a cooked potato. They should be tender, not firm.
Once roasted, carefully unwrap the foil and let the beets cool slightly. Once cool enough to handle, remove the skins if you haven’t already – they should peel off easily. Then, transfer them to the fridge to chill for about 20 minutes. Chilling helps the beets firm up slightly and ensures the hummus maintains a desirable texture.
Gathering Your Hummus Essentials
While the beets are cooling, it’s the perfect time to gather the rest of your ingredients. The beauty of homemade hummus lies in its simplicity, relying on a few key components to create a harmonious blend of flavors and textures.
The Core Ingredients and Their Role
- Chickpeas: The foundation of any good hummus! A 15-ounce can of chickpeas (garbanzo beans), rinsed and drained, provides the creamy base and satisfying texture.
- Garlic: Fresh garlic cloves are essential for that characteristic pungent, aromatic kick. I’m a firm believer that you can never have too much garlic in hummus, so feel free to adjust to your taste.
- Lemon Juice: Freshly squeezed lemon juice brightens the entire dip, adding a crucial tangy zest that cuts through the richness and balances the flavors.
- Olive Oil: Good quality extra virgin olive oil contributes to the smooth consistency and adds a fruity, peppery depth. We’ll use some in the hummus itself and a drizzle for serving.
- Salt & Cumin: These foundational spices are non-negotiable. Salt enhances all the other flavors, while cumin provides a warm, earthy, slightly spicy note that is synonymous with traditional hummus.
- Tahini (Optional but Recommended): While the original recipe lists tahini as optional, I highly recommend including it. Tahini, a paste made from ground sesame seeds, adds an incredible richness, nutty depth, and a silken texture that elevates homemade hummus from good to extraordinary. If you’ve never used it, now’s the time to try!
- Water: A few tablespoons of water help achieve that perfectly smooth, spreadable consistency. You’ll add it gradually to reach your desired creaminess.
Crafting Your Perfect Beet Hummus
With your roasted beets cooled and all your ingredients at hand, it’s time for the magic to happen in your food processor or blender. This is where all those individual components come together to form a truly irresistible dip.
The Blending Process for Creamy Perfection
Carefully transfer your cooled, peeled, and quartered roasted beets into the bowl of your food processor or high-speed blender. Add the chickpeas, generous amounts of fresh garlic, the bright lemon juice, a portion of the olive oil (reserve some for drizzling), the salt, and the warm cumin. If you’re using tahini, add it in now as well. These ingredients form the base of your vibrant beet hummus.
Process everything together for an initial 30 seconds. At this stage, the mixture will be quite thick and possibly a bit chunky. Don’t worry; this is just the beginning!
Oh, and make sure those beets are cooled down a bit. Don’t forget them!
Blend it all up for about 30 seconds.
Next, add in about 2-3 tablespoons of water. This is where you start to adjust the consistency. Blend for another 30-45 seconds. You’ll notice the hummus becoming progressively smoother and creamier. The water helps to emulsify the ingredients and achieve that desirable velvety texture.
Continue to blend and process, scraping down the sides of the bowl as needed, until you achieve your desired creamy consistency. Some prefer a thicker, heartier hummus, while others enjoy a lighter, airier texture. Don’t hesitate to add another tablespoon of water if it seems too thick. Taste and adjust seasonings if necessary; you might want a little more salt, lemon, or even a touch more cumin. Remember, the key is to blend until it’s perfectly smooth and free of any gritty pieces.
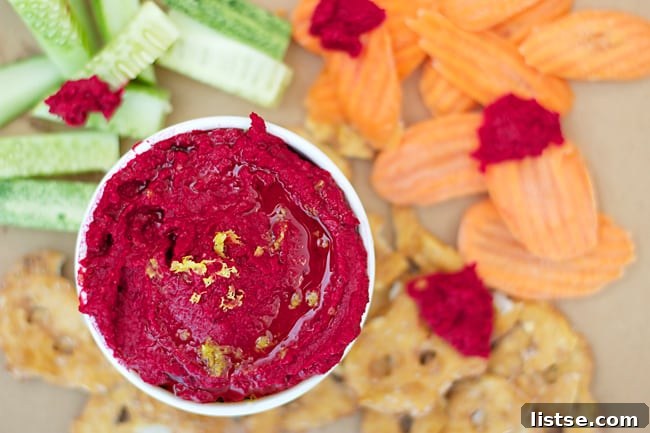
Voila! You’ve just created the prettiest, most vibrant hummus you ever did see!
Serving Suggestions and Storage Tips
Your beautiful roasted beet hummus is now ready to be enjoyed! Here are some ideas to make the most of this delightful dip:
- Classic Dipping: Serve it with warm pita bread, an assortment of fresh-cut vegetables like cucumber slices, carrot sticks, bell pepper strips, or celery.
- Spread it On: Use it as a flavorful spread for sandwiches, wraps, or even a unique base for avocado toast.
- Elevate Your Salads: Dollop a generous spoonful onto your favorite green salad for an extra boost of flavor and nutrition. You can even thin it slightly with a bit of water or lemon juice to create a vibrant salad dressing.
- Appetizer Platter: Incorporate it into a mezze platter alongside olives, feta cheese, and other Mediterranean delights.
- With Grains: Serve it alongside quinoa or rice bowls for a plant-based protein boost.
To really make it shine, drizzle with a little extra virgin olive oil just before serving. A sprinkle of paprika adds a lovely contrasting color and a hint of smoky flavor, while some fresh lemon zest or chopped herbs like parsley or dill can brighten the whole dish. Enjoy every delicious, vibrant bite!
And smile as people look at you in awe of such a creative and delicious dish! This vibrant dip is not only a treat for your taste buds but also a feast for the eyes.
Storage
Store any leftover roasted beet hummus in an airtight container in the refrigerator for up to 5-7 days. The flavors tend to meld even more beautifully over time, making it a fantastic make-ahead option for meal prepping or entertaining.
Roasted Beet Hummus: The Printable Recipe
Here’s the full recipe, ready for you to print and try in your own kitchen. Prepare to impress your taste buds and your guests with this stunning and healthy dip!
Ingredients:
3 small-medium beets, stemmed and quartered
15 oz can of chickpeas, rinsed and drained
Juice of one large lemon (about 2-3 tablespoons)
3 medium cloves of garlic (or more, to taste)
3 tablespoons of olive oil, divided, plus more for serving
1/2 teaspoon salt
1/2 teaspoon cumin
3 tablespoons water (plus more as needed)
optional: 1/4 cup tahini
Directions:
To roast beets:
1. Preheat your oven to 375 degrees F (190 degrees C).
2. Place the stemmed and quartered beets in a piece of aluminum foil. Drizzle with about 1 tablespoon of olive oil.
3. Wrap the foil tightly around the beets, creating a sealed packet.
4. Bake for approximately 45 minutes to 1 hour, or until the beets are fork-tender. The cooking time may vary depending on the size of your beets.
5. Let the roasted beets cool in the foil packet for a few minutes, then carefully unwrap. Once cool enough to handle, remove the skins (they should slip off easily).
6. Transfer the cooled, peeled beets to the fridge for about 20 minutes to chill before using in the hummus.
For Hummus:
1) In the bowl of a food processor or high-speed blender, combine the cooled roasted beets, rinsed and drained chickpeas, minced garlic, fresh lemon juice, the remaining 2 tablespoons of olive oil, salt, cumin, and the optional tahini (if using).
2) Process for about 30 seconds until the ingredients start to break down and combine.
3) Add in 2-3 tablespoons of water. Continue to blend and process for another 30-45 seconds. Scrape down the sides of the bowl as needed.
4) Continue to blend and process, adding additional water (1 tablespoon at a time) if necessary, until you achieve your desired creamy and smooth consistency. Taste and adjust seasonings (salt, lemon juice) if needed.
5) Transfer the finished roasted beet hummus to a serving bowl. Drizzle with a bit of extra virgin olive oil, sprinkle with paprika, and garnish with fresh lemon zest or chopped herbs, if desired. Serve immediately or chill for later enjoyment.
This roasted beet hummus is more than just a dip; it’s a testament to how simple ingredients can create something extraordinary. It’s healthy, incredibly flavorful, and brings a beautiful splash of color to any meal. Give it a try, and prepare to add this vibrant creation to your regular recipe rotation!