
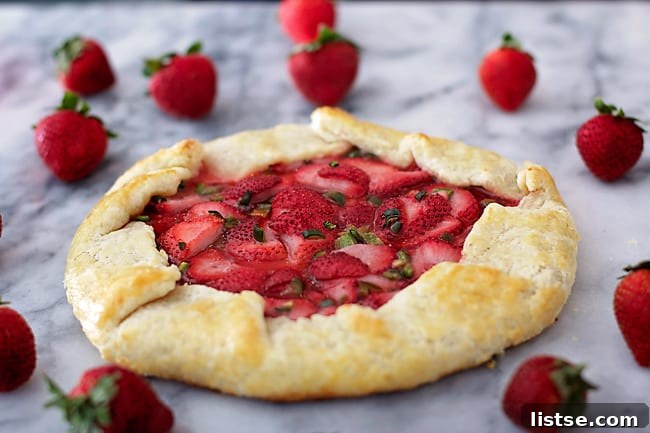
Unexpected Delight: The Ultimate Strawberry Jalapeno Crostata Recipe
Sometimes, the most extraordinary culinary creations spring from the simplest circumstances. This Strawberry Jalapeno Crostata is a testament to that – a “let’s see what we can throw together” moment that blossomed into an incredibly delicious and unforgettable dessert. Born from a combination of garden abundance and a craving for something rustic and sweet, this recipe quickly became a household favorite. It’s surprisingly simple to make, yet delivers a complex flavor profile that will have everyone asking for more. Prepare to be amazed by this sweet and spicy masterpiece that tastes like pure genius.
The inspiration for this unique crostata came from two undeniable facts: my thriving jalapeno plant was overflowing with vibrant peppers ready for harvest, and I was absolutely in the mood for a rustic, free-form tart. The idea of blending sweet and spicy flavors had been brewing, and this was the perfect opportunity to experiment. This crostata isn’t just a dessert; it’s a celebration of seasonal produce and inventive baking, proving that sometimes, the best recipes are the ones you stumble upon in your own kitchen.
From Garden to Genius: The Birth of a Unique Flavor
Initially, I considered venturing into savory territory, envisioning a cheesy crostata concoction to highlight the fresh heat of the jalapenos. However, a quick check of the refrigerator revealed a bounty of fresh strawberries, nearing the end of their peak. It was a pivotal moment. The thought of pairing the vibrant sweetness of strawberries with the subtle kick of jalapenos immediately sparked curiosity. Could this unusual combination work? Would the contrasting flavors create a harmonious balance or a culinary clash?
With the ingredients laid out before me – luscious strawberries and crisp jalapenos – the decision was made: a Strawberry Jalapeno Crostata it would be. Before diving in, I did what any modern baker would do: consulted the internet. To my surprise, a search for “Strawberry Jalapeno Crostata” yielded precisely zero results. This left me pondering two possibilities: either I was on the verge of a revolutionary culinary breakthrough, or I was about to create a truly terrible concoction. As it turned out, the former was true. I confidently declare: I am a genius! This unique pairing is not just good; it’s exceptional, offering a tantalizing dance of flavors that excites the palate.
Tips for Perfecting Your Crostata: Spice Level & Serving
A note of caution and a valuable tip from my first attempt: I was a bit heavy-handed with the jalapeno, though thankfully, the variety from my garden was pleasantly mild. For those who prefer a more subtle heat, I recommend starting with a slightly lesser amount of jalapeno than specified and adjusting to your personal preference. Another crucial tip is to serve this crostata immediately. While delicious, the jalapeno flavor tends to intensify significantly overnight. If you anticipate having leftovers, consider reducing the jalapeno quantity in the filling to maintain the ideal sweet-to-spicy balance over time. This crostata is truly best enjoyed fresh, when the crust is perfectly crisp and the filling is warm and vibrant.
Crafting the Flaky Buttermilk Crust: The Foundation of Flavor
The journey to a perfect crostata begins with an exceptional crust. For this recipe, I’ve fallen in love with a particular technique, adapted from the brilliant Joy the Baker. Her method yields an incredibly tender, flaky, and flavorful crust that forms the ideal base for our unique filling. Since we’re making a single-crust crostata, I’ve halved her original recipe to ensure just the right amount of dough. The secret ingredient? Buttermilk. It adds an unparalleled richness and subtle tang that elevates the entire experience, contributing to a wonderfully soft yet sturdy texture.
The key to a truly flaky crust is keeping all your ingredients as cold as possible. Begin by combining all your dry ingredients – flour, sugar, and salt – in a bowl. Place this bowl directly into the freezer for a few minutes. This ensures that every component is thoroughly chilled, preventing the butter from melting too quickly during mixing and allowing it to create those coveted pockets of steam that result in a light, airy crust.
Next, take your cold, unsalted butter and cut it into small, uniform pieces. Add these butter pieces to the chilled dry ingredients in the bowl and return it to the freezer for another few minutes. The colder your butter, the flakier your crust will be. Some bakers prefer to cut their butter into the flour using a rolling pin, creating a rustic, shaggy mixture. My preferred method for efficiency and consistency is using a food processor. You can choose the technique that works best for you, as both will yield excellent results as long as the butter remains cold.
If using a food processor, pulse the butter and flour mixture a few times until the butter pieces are coated with flour and resemble coarse crumbs, with some pea-sized chunks remaining. Avoid over-processing, as this can warm the butter and develop the gluten, resulting in a tough crust. Once the mixture reaches the desired consistency, transfer it to a large bowl and place it back in the fridge for another few minutes to ensure it’s still perfectly cold.
Now for the buttermilk. Create a well in the center of your butter and flour mixture. Pour all the COLD buttermilk into this well. Using a fork or your hands, gently mix until the flour and butter are just combined with the buttermilk, forming a shaggy dough with no dry clumps of flour remaining. If the mixture seems too dry, add an additional splash of buttermilk, a teaspoon at a time, until everything is nicely moistened. The dough might feel a bit challenging to bring together, but persist gently until it forms one cohesive ball. Once formed, wrap the dough tightly in plastic wrap and let it chill in the fridge for at least an hour. This resting period is crucial; it allows the gluten to relax, making the dough easier to roll out and contributing to a more tender final product.
Preparing the Sweet & Spicy Filling: Strawberries & Jalapenos
While your dough is happily chilling, you can prepare the star of our show: the strawberry and jalapeno filling. Begin by hulling your fresh strawberries – removing the green tops and any white core. Place the hulled strawberries in a medium bowl and gently coat them with sugar. The amount of sugar can be adjusted to your preference, depending on the sweetness of your berries and how tart you like your crostata. Give them a good stir to ensure even coating.
Once the berries are shimmering with sugar, add the cornstarch, vanilla extract, and a squeeze of fresh lemon juice. The cornstarch acts as a thickening agent, ensuring the filling sets beautifully and isn’t too runny. Vanilla extract enhances the natural sweetness of the strawberries, while lemon juice brightens the flavors and helps prevent the berries from oxidizing. Mix all these ingredients thoroughly until everything is well combined. You might notice some excess juice accumulating at the bottom of the bowl; gently pour this out before setting the strawberry mixture aside. This step helps prevent a soggy bottom crust.
Next up are the jalapenos. This is where you control the heat. Carefully dice your desired amount of jalapeno into tiny, uniform pieces. For a milder crostata, remove the seeds and white membranes, as these contain most of the capsaicin (the compound responsible for the heat). If you enjoy a more pronounced kick, you can leave some seeds in. I opted for very tiny pieces to ensure the heat was evenly distributed and complemented, rather than overpowered, the strawberries. Remember to wash your hands thoroughly after handling jalapenos, or wear gloves to avoid any irritation.
Assembling Your Rustic Masterpiece: The Crostata Fold
Once your dough has had ample time to rest and chill, it’s time to assemble your crostata. Preheat your oven to 400 degrees Fahrenheit (200 degrees Celsius). Lightly flour a clean work surface and your rolling pin. Take your chilled dough ball and roll it out into a circle, approximately 12 inches in diameter. Don’t stress about achieving a perfect circle; the charm of a crostata lies in its rustic, free-form nature. Imperfections only add to its homemade appeal!
Carefully transfer the rolled-out dough to a baking sheet lined with parchment paper. In a small bowl, whisk together one egg with a tablespoon of water to create an egg wash. Brush the center of the dough with this egg wash, leaving a clean border of about 1.5 inches around the edges. This egg wash will help the crust achieve a beautiful golden sheen during baking.
Now, gently spoon all of your prepared strawberry mixture into the center of the crust, spreading it evenly within the egg-washed area. While it’s tempting to meticulously arrange the strawberries, remember the rustic aesthetic. Simply let them fall naturally; the beauty is in the delicious chaos. I tried arranging mine perfectly once, and it still ended up looking wonderfully “rustic.”
Once the strawberries are in place, evenly sprinkle your diced jalapenos over the top of the fruit. This distribution ensures that every bite gets a hint of that exciting sweet and spicy flavor. Now for the signature crostata fold: gracefully lift the edges of the dough and fold them inwards over the fruit filling, creating overlapping pleats. There’s no precise science to this – embrace the free-form style. The goal is to encase the filling while leaving a generous portion of the fruit exposed in the center. The overlapping folds create a beautiful, artisanal look, as demonstrated in the images below.
Voila! Your rustic beauty is almost ready for its grand transformation in the oven.
Finally, brush the folded edges of the crostata crust with the remaining egg wash. This last step contributes to a beautifully golden, shiny crust that perfectly complements the vibrant filling. Carefully transfer the baking sheet with your assembled crostata into the preheated oven.
Baking & Enjoying Your Strawberry Jalapeno Crostata
Bake your crostata for 25-35 minutes, or until the crust is deeply golden brown and the fruit filling is bubbling enticingly. The aroma filling your kitchen will be absolutely captivating! Once baked to perfection, remove the crostata from the oven and let it cool on the baking sheet for a few minutes before transferring it to a wire rack. While it’s tempting to dig in right away, allowing it to cool slightly helps the filling set and makes for easier slicing. This crostata is more than just a dessert; it’s a delightful party pie, an adventurous treat, and a wonderful way to utilize those last seasonal strawberries. It’s truly a celebration of flavor and creativity. Enjoy!
Strawberry Jalapeno Crostata Recipe
This recipe delivers a perfectly flaky crust with a sweet, spicy, and tangy fruit filling. Adjust the jalapeno to your desired heat level!
Ingredients:
For the Crust (adapted from Joy the Baker):
6 ounces (approximately 1 1/4 cups) all-purpose flour
4 ounces (1 stick) cold, unsalted butter, cut into small cubes
1/2 tablespoon granulated sugar
1/2 teaspoon fine sea salt
1/4 cup cold buttermilk (plus a splash more if needed)
1 large egg, whisked with 1 tablespoon water (for egg wash)
For the Filling:
~1 pound fresh strawberries, hulled and quartered or halved if small
2 tablespoons granulated sugar (adjust to taste)
1 tablespoon cornstarch
1/2 teaspoon vanilla extract
1 teaspoon fresh lemon juice
1 medium to large jalapeno, finely diced (remove seeds/membranes for less heat)
Directions:
- Prepare the Crust: In a large bowl, combine the flour, 1/2 tablespoon sugar, and salt. Place the bowl in the freezer for 10 minutes.
- Add the cold, cubed butter to the dry ingredients and return the bowl to the freezer for another 5 minutes.
- Transfer the chilled butter and flour mixture to a food processor. Pulse a few times until the butter is coated with flour and resembles coarse crumbs with some pea-sized pieces remaining. Avoid over-processing.
- Transfer the mixture back to a large bowl and make a well in the center. Pour in the cold buttermilk. Mix gently with a fork or your hands until the flour and butter are fully moistened and a shaggy dough forms. Add an extra splash of buttermilk if necessary to bring it together.
- Gather the dough into a rough ball, wrap it tightly in plastic wrap, and refrigerate for at least 1 hour (or up to 2 days).
- Prepare the Filling: While the dough chills, hull and quarter/half the strawberries. Place them in a medium bowl and gently coat with 2 tablespoons of sugar.
- Add the cornstarch, vanilla extract, and lemon juice to the berries. Mix thoroughly. Pour out any significant excess liquid from the bottom of the bowl and set aside.
- Finely dice the jalapeno to your desired heat level (removing seeds and membranes reduces heat). Set aside.
- Assemble & Bake: Preheat your oven to 400 degrees F (200 degrees C). Line a baking sheet with parchment paper.
- On a lightly floured surface, roll out the chilled dough into an approximately 12-inch circle. Don’t worry about perfection; rustic is key! Transfer the dough to the prepared baking sheet.
- Brush the center of the dough with the egg wash, leaving about a 1.5-inch border around the edges clean.
- Spoon the strawberry mixture onto the center of the crust, arranging as desired.
- Sprinkle the diced jalapeno evenly over the strawberries.
- Gently fold the edges of the dough over the filling, creating overlapping pleats (refer to the images above for guidance). Brush the folded edges of the crust with the remaining egg wash.
- Bake for 25-35 minutes, or until the crust is golden brown and the filling is bubbly.
Let the crostata cool on the baking sheet for a few minutes before transferring to a wire rack to cool slightly more. This crostata is best served fresh on the day it’s made to experience the optimal balance of flavors and textures. Enjoy every unique bite!